
Copic Tutorials Coloring
Different Skin Colors
Well this week at Die Cuts R Us we are having a HUGE Copic Sale!!!! All Ciao Copics are available for $2.99 each what a steal!!!! All of the Sketch colors I put in this tutorial will also be available for Pre-Order with Claudia to so if I used somthing that you can not get in a Ciao you can order the Sketch with Claudia along with your Ciao Copics!!!!
If you are just starting out with Copics I suggest getting at least about 3 of each color group because to really do blending and shading you need 3 Colors in a color group.
Some Staple Copics I can not live without are:
R00, E00, E93, RV21, RV13, RV00, E50, E51, E53, E55, E30, E31, E33, E35, E39, V000, V04, V12, V17, Y02, Y08, Y38, Y21, Y28, BG10, GB15, BG18,BG72, BG75, BG78, G20, G21, G24, B21, B24, B29, B91, B95, B97, B99, R20, R29, R35, R39, R81, R83, R85, YR00, YR02, YR04, YR09, YR68, E08, E09, RV02, RV06, YG00, YG03, YG09, Colorless Blender, Black 00, and Grays C1, C2, C3, C5, C7
Now here are a few cards I have made for challenges or just for fun using The Greeting Farm Stamps and Copics. I added these for you to see what my finished Copic Coloring looks like!!!!
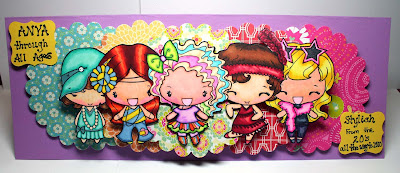
Above and Below is a card I made using several variations on Cacasian Skin Tones. These are all The Greeting Farm Anya Stamps.

Here is a Card I made for a TGF Challenge the Male Mer-Man has the more pale caucasian skin tone and the female Mermaid has the more pinky skin tone.

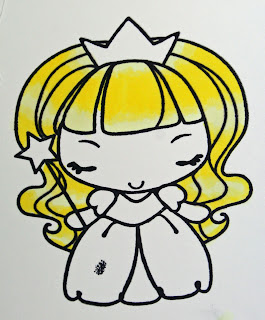
This last card shows a little TGF Twinkle Tot with a pinky caucasion look to her skin

Copic Skin Coloring Tutorial
Quick Note Before you read down normally I would do each of these steps on the skin of the arms legs, belly and neck but as I was focusing on the faces I did not take the time to do the other skin places as well so if you see them looking a different color than the faces pay no attention normally you would color them the same as you are the faces you would just not do the coloring of the blused cheeks step!!!
Now onto the Tutorial for the Caucasian Skin Tones I stamped up two TGF Stella images and colored them all up except for the Skin.

Below I started Coloring the red headed Stella with a Base Color of E50 and the Black Haired Stella with a base of R00.
For my pink Skin Tones I use R00 Base, E00, E93 and RV21 for the cheeks
For my porcelain Skin Tones I use E50 Base, E51, E00, and RV00 or RV02 for the cheeks.
Below E50 and R00 in center of Stella's Face

Below Stellas Full Face Colored with E50 and R00

Next Step:
I take my next color with for porcelain Skin is E51 and for Pinkish Skin is E00 and I make a wide boarder around the whole face edge
Below
Base E50, E51 wide boarder and Base R00 and E00 wide boarder

Next Step:
Now I take the last skin color and go in a very fine or thin line around the outside of the face at the very edge of the wider boarder I also accent the eyebrows and any other part of Stella that I want shaded in the darkest skin tone but don't go overboard or when you blend you skin will be much darker than you want it to be.
Below
Base E50, Wide Boarder E51, Thin edge boarder E00
Base R00, Wide Boarder E00, and Thin edge boarder E93

Next Step:
Take your Base Color and in circles blend the boarders into the middle of the face leaving the very center a little lighter.
Now take your Cheek Colors and draw your cheeks I use RV00 or RV02 depending on how pink you want it on the Porcelin Skin Tone and I use RV21 on the Pink Skin Tone

Take your base color again and blend just the cheeks edges around to create a blended overal look but you do not want to blend out to the whole face or you will get a really pink look.
Lastly I take my 00 Colorless blender and just take a few areas and move it around to push the color out and add some areas of lighter shading.
Below Final products

African American Skin Tone, and Latino/Indian/Asian Skin Tones


You will repeat all the steps above as you see in the pictures just use these colors instead of the Caucasian Colors.
Below:
Latina/Asian/Indian Base E30, African American Base E33

Full Face Colored E33 and E30

Base E33, Wide Boarder E35
Base E30 and Wide Boarder E31

Base E33, Wide Boarder E35, thin edge boarder and accents E37
Base E30 Wide Boarder E31 and thin edge boarder and accents E33

Blended all using circular motions and Base Color of E33 and E30

Added Cheek Colors for Asian I use RV21, and for African American I use RV13

Final blended look of the African American and the Asian/Latino/Indian Look.

Now here is a Tutorial that I wrote up and is on my Blog showing you how to color different Hair colors and add the shine to them as well. You will see how to color Blonds, Brunettes, and Red Heads too!!!
O.K. So How do I use my copics to color??? I have had several people ask and a few wanted a tutorial so I thought why not I can do that right??? Well I hope I can anyway!!! LOL!!!!!

Coloring Blondes

Y02, Y08, Y38, Y28
E50, E51, E53, E43

Y21, Y23, Y26, Y28

E50, E53, E43, Y28

Y02, Y06, Y08, Y38,
Y0000, Y02, Y06
Coloring - Red Heads

I am sorry this was supposed to be a light brown/strawberry blonde and I have no idea which colors I used to achieve it!!! So Sorry!!!

YR02, YR09, E07, E09

YR00, YR02, YR04, YR09, E07, E09
Coloring Brunettes

E33, E35, E37, E29

E30, E35, E37, E39, BG10, BG72, BG75

E33, E35, E37, E39

E31, E35, E37, E29

E43, E71, E77
Black and Grey Hair

C1, C2, C3, C5

C2, C3, C5, C7
Getting Creative with Colors

V00, V04, V12, V17

Medium Blonde - E50, E51, E53, Y26
Purple V000, V12, V04, V17
Orange YR00, YR04, YR09
Green YG00, YG03, YG09
Now how do I achieve the above looks??? Here is the Tutorial

I usually use 3 to 4 shades in a color group but with Red Heads I personally use between 5 and 6 colors to achieve my read heads look.
I color the entire head in my lightest of that color shade. Above you can see how I added which color I was using in green off to the side I will add each shade as we go to the green list off to the side. Next I decide where I want my shine or lightest spots to be on my hair usually either I choose to have one above and below the main darker part of the hair as you see right below in the light blond, or I choose to have the darker parts of the hair without the shiny parts of the hair start in the ends and the lightest shiny parts to be between the dark parts as you see in the picture below that.

Above picture (Shine of hiar above and bleow the darker colored parts of the hair)
Below Picture (Shine in the center of the darker sections of the hair)

So in the picture above I start stage two of coloring my hair I use the next shade in my color group I have chosen (When I say color groups I mean the groups of colors I have picked to be my go to shades for each hair color so for example for dark brown that is usually E30 or 31, E35, E37 and E29 for me)

Now I add my 3rd color for the shade and I put that in between the middle of the dark spots so that it leaves the edges of the dark spot the lighter color and then in between the darker sections there is the lighted sections so this will in the end help all the colors to blend together darkest in the middle then fades out to the next shade and so on and so forth depending on how many shades you are using. If you are only using three shades then after this stage you can begin the blending stage if not keep going!!!!

As I said earlier I use more shades on Red Heads then any other of the hair colors so you can see that above. For red heads depending on how light or dark I want them I do the base color in YR00 or YR02 (if I did the lighter then the next fade out center dark shaded area is the YRO2 if I started with YRO2 as my base the next shade is YR09)
So my red heads are either YRO2, YR09, E07 and E09, or YR00, YR02, YR04, YR09, E07 and E09 depending on what kind of read head I am trying to achieve.

So above I used two 4 shade color schemes and the red head is the 6 shade color scheme.
Now on to the Blending I go back and take my lightest shade I used for the base of the hair and start blending in the edges of all the colors in a circular motion. Don't blend so much that your shades completely disappear or you will loose some of the shine/lit are of the hair.

For really light blondes I will either leave the entire center white and just outline the edges in like Y06 or I will do what you see below and use Y000, Y02, and Y06

So Below you have examples of the main hair colors Red, Brunette Dark, Brunette light/ dark blonde, medium blonde, and light blonde.
The last thing I do is go back with all my shades and add to the tips of each section to make them closer to the lightest part which will become your light/shiny part of the hair and sort of blend and shade it all a 2nd time I especially have to do this for the red heads as you will see at the top of the tutorial where I have all the examples of the coloring for hair shades.

Well that about explains how I do my hair does it make sense to you can you follow it??? If you have more questions feel free to ask me and I will try to make it more clear or answer any guestions that you might have!!
What other tutorials would you like to see??? Let me know and I will put them together for you!!!!
Heather

14 comments:
Heather you did a STELLAR job on your tutorial. Amazing samples!
Smiles!
Gwen
WOW, Ms Heather, your tutorial is really nice!
WHEW! I am exhausted - but totally INSPIRED! Thank you Heather! Awesome job, especially with all the copics on sale this week here at DCRU! WOOHOO!
what a fantastic tutorial...superbly illustrated..fantasitc
Super tute, Heather!! TFS!
WOW! That was one extensive coloring tutorial with LOTS of pictures! I LOVE IT! All the varieties of pics are nice to see and I especially liked the part on giving sheen to hair. Never tried that before!
-Stacie
Wow! FABULOUS tut! I'll be bookmarking this for sure! Thanks so much! xxD
Heather,
What amazing work! Your step by step is amazing. I see lots of new Copics in my near future.
Thanks so much for a wonderful post!
Claudia (DCRU Owner)
WOW Heather...thank you SO much for this tutorial. I struggle so much with coloring hair and getting it to look "right". I'm printing this out and I'm going to practice as soon as I get home today! THANK YOU!
WOW!! This is a fabulous tut Heather!! I already learned a new trick on coloring cheeks!! Now I need to see what colors I am missing so I can take advantage of the fabulous sale here at DCRU!!
I am exhausted just reading this! WOW Heather!!! This is an AMAZING tutorial and I bet there are some beginning Copic users out there who will now want to buy more markers because you have done such a great job showing how to use them! it's an AWESOME tutorial!!! Now i'm off to check out the sale :D heehee
Great tutorials. I always have issues with facial features, so this helps alot.
Heather! OMG this is fantastic information! I am a new copic user and this is just PERFECT for me! I really needed the skin tone and hair stuff! Thank you so very much!
Wowzers!!! SUPER tutorial Heather! You have no idea how helpful this has been for me! I always wondered how to do skin and hair color and now you've taught me : )
Hugs
Amber
Post a Comment